Testinvite organizes all tests into sections. A test can comprise of one or multiple sections. A section in a test is where all the pages containing your test questions are housed. The creation of a test automatically initiates the creation of a section within it.
Adding a new section into the test
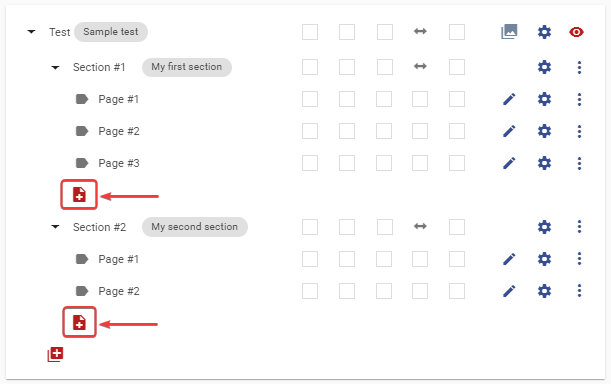
To add a new section to your test, click on the red plus button located at the bottom left of the Test Designer interface.
Arranging the order of the sections
To rearrange the order of the sections, you can use the menu icon located on the same row as the section you want to move. Click on the menu icon and choose "Move up" or "Move down" to change the position of the section.
Adding a page into a section
To add a new page to a section, click on the red plus icon located after the last page of the section.
Arranging the order of the pages within a section
To rearrange the order of the pages within a section, you can use the menu icon
located on the same row as the page you want to move. Click on the
menu icon and choose "Move up" or "Move down" to change the position of the page.
Section settings
To access the settings of a section and make modifications, you can click on the blue gear icon found in the same row as the section you want to modify.
Configuring the settings of a section
Naming the section
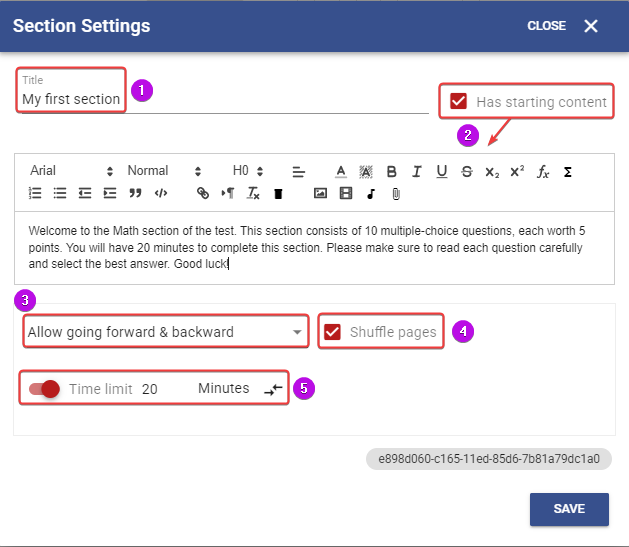
Use the text field (1) to provide a name for your section. The name of the section is presented to the test-taker while taking the test.
Setting up a starting content for the section
To add a starting content to a section, enable the "Has starting content" option and then use the editor that appears below to compose the content.
A starting content of a section refers to any introductory or explanatory text, images, or media that is displayed at the beginning of a section within a test.
If a section has been set up with a time limit and starting content, the timer will begin once the test-taker proceeds past the starting content and enters the first page of the section.
Limiting test-taker navigation options within section pages
By default, test-takers are allowed to navigate among the pages within a section.
One exception to note is for timed pages, as they can only be visited once by the test-taker and cannot be navigated back to again.
You have the option to restrict the test-taker's navigation within the pages of a section by selecting different settings.
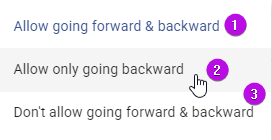
Allow going forward & backward: The default option that allows the test-taker to navigate freely among the pages of the section.
Allow only going backward: With this option, the test-taker can navigate to pages that have already been visited but can only visit upcoming pages in the given order, without jumping to pages that come after the following page.
Don't allow going forward and backward: This option prevents the test-taker from freely navigating among the pages of the section. With this option, they can only visit the pages in the given order one by one
Please note that the navigation settings within the section settings only apply to the pages within that specific section. If you wish to restrict how the test-taker navigates among the sections of the test, you should refer to the test settings.
Randomizing the order of pages for each test-taker
Select the Shuffle pages option if you would like the order of the pages within a section are randomized for each test-taker.
You can mark certain pages to keep their order by selecting the "Keep the order fixed" option. This will prevent those pages from being shuffled with the other pages when the "Shuffle pages" option is enabled.
To mark a page to keep its order, click on the menu icon located at the same row within the page and select "Keep the order fixed" option.
Since the Shuffle pages option is enabled for the Section, you will notice a shuffle icon (1) next to the Section in the Test Designer.
Click on the menu icon (2) located at the same row within the page and select "Keep the order fixed" option.
Notice that an anchor icon (3) is displayed in the same row as the page that has been marked as "Keep the order fixed."
Setting a time limit for the section
To set a time limit for a section, simply turn on the Time limit option and enter the desired number of minutes.
Please note that in addition to setting a time limit for a section, you can also set time limits for individual pages and the entire test. The time limit for a page is set within its settings, while the time limit for the entire test is set within the test's settings.